Topologi
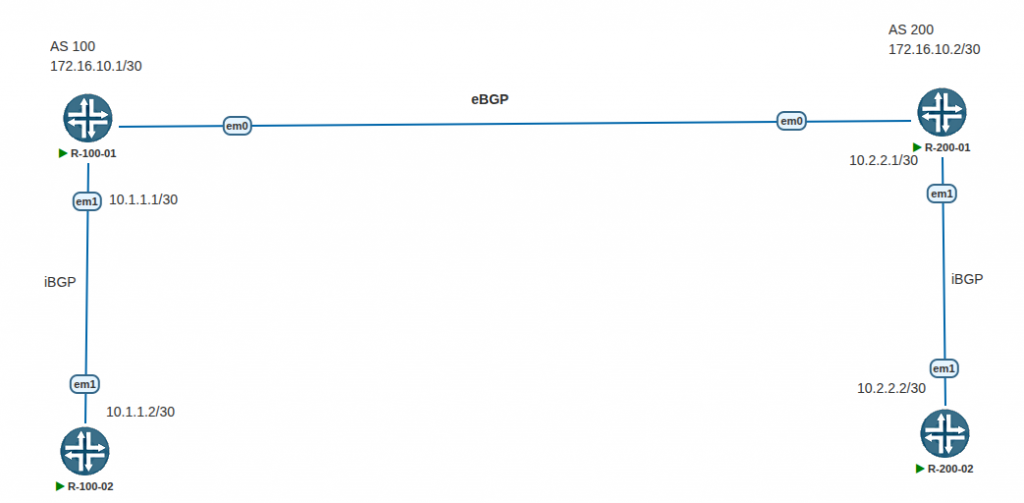
IP config
R-100-01
set interface em0 unit 0 family inet address 172.16.10.1/30
set interface em1 unit 0 family inet address 10.1.1.1/30
R-100-02
set interfaces em1 unit 0 family inet address 10.1.1.2/30R-200-01
set interfaces em0 unit 0 family inet address 172.16.10.2/30
set interfaces em1 unit 0 family inet address 10.2.2.1/30
R-200-02
interfaces em1 unit 0 family inet address 10.2.2.2/30AS Number config
R-100-01 & R-100-02
set routing-options autonomous-system 100R-200-01 & R-200-02
set routing-options autonomous-system 200eBGP Peers config
R-100-01
edit protocols bgp
set group ebgp-peers
set neighbor 172.16.10.2 peer-as 200
set type external
R-200-01
edit protocols bgp
set group ebgp-peers
set neighbor 172.16.10.1 peer-as 100
set type external
iBGP Peers config
R-100-01
edit protocols bgp
set group ibgp-peers
set neighbor 10.1.1.2
set type internal
R-100-02
edit protocols bgp
set group ibgp-peers
set neighbor 10.1.1.1
set type internal
R-200-01
edit protocols bgp
set group ibgp-peers
set neighbor 10.2.2.2
set type internal
R-200-02
edit protocols bgp
set group ibgp-peers
set neighbor 10.2.2.1
set type internal
Set routing policy
Create this policy on all routers
set policy-options policy-statement BGP term 1 from protocol direct
set policy-options policy-statement BGP term 1 then accept
set policy-options policy-statement BGP from protocol direct
set policy-options policy-statement BGP then accept
Assigning Routing Policy
R-100-01 & R-200-01
set protocols bgp group ebgp-peers export BGP
set protocols bgp group ibgp-peers export BGP
R-100-02 & R-200-02
set protocols bgp group ibgp-peers export BGPVerification
root@R-100-01> show bgp summary
Threading mode: BGP I/O
Default eBGP mode: advertise - accept, receive - accept
Groups: 2 Peers: 2 Down peers: 1
Table          Tot Paths  Act Paths Suppressed    History Damp State    Pending
inet.0
                      1          0          0          0          0          0
Peer                     AS      InPkt     OutPkt    OutQ   Flaps Last Up/Dwn State|#Active/Received/Accepted/Damped...
10.1.1.2                100          0          0       0       0     1:15:32 Establ
172.16.10.2             200        172        171       0       0     1:15:29 Establ
 inet.0: 0/1/1/0

root@R-100-01>
root@R-100-01# run ping 10.2.2.2
PING 10.2.2.2 (10.2.2.2): 56 data bytes
64 bytes from 10.2.2.2: icmp_seq=0 ttl=63 time=1.431 ms
64 bytes from 10.2.2.2: icmp_seq=1 ttl=63 time=1.352 ms
64 bytes from 10.2.2.2: icmp_seq=2 ttl=63 time=1.301 ms
64 bytes from 10.2.2.2: icmp_seq=3 ttl=63 time=1.147 ms
64 bytes from 10.2.2.2: icmp_seq=4 ttl=63 time=1.230 ms
64 bytes from 10.2.2.2: icmp_seq=5 ttl=63 time=1.363 ms
^C
--- 10.2.2.2 ping statistics ---
6 packets transmitted, 6 packets received, 0% packet loss
round-trip min/avg/max/stddev = 1.147/1.304/1.431/0.093 ms

[edit]
root@R-100-01#
root@R-100-01# run traceroute 10.2.2.2
traceroute to 10.2.2.2 (10.2.2.2), 30 hops max, 52 byte packets
1 172.16.10.2 (172.16.10.2) 2.083 ms 0.604 ms 0.403 ms
2 10.2.2.2 (10.2.2.2) 1.330 ms 1.004 ms 1.096 ms
[edit]
root@R-100-01#

